Just SPO600

So this semester I had a pleasure taking SPO600 that was about software portability and optimization. In other words, if you have a piece of software, this course would teach you how to make this software work, work with increased performance and in different environments (CPU architecture, system requirements etc). I would consider this course as something that lies between programming and what is know by the term IT – you do not create software, but you work with the code using some hardware specific methods.

During this course I learned about CPUs, how they work, how to make them perform specific instruction, how to program on CPU level and so on. I already knew about CPUs, different processor architectures, but my knowledge was very basic, and now I got a chance to learn in-depth about it and apply my knowledge in practice.

I really liked how this course was structured, as there were, pretty much, no obligations, due dates or whatsoever – it was very informal and friendly, which makes this course different (in a good way for sure) from any other courses I’ve had in Seneca. Also, we got introduced to Open Source community and were provided with lots of opportunities to visit different events, such as FSOSS and X-Windows conference – another way to get in touch with Open Source communities and meet many interesting people. The only downside of this course was that some questions in quizzes we had were pretty unexpected, and when the professor was answering those questions, you would sit like “What is this? I see it for the first time”. However, if you look at “Additional materials” links at the bottom of each week’s wiki-page, you would find many useful resources and everything gets clear after that. Also, even if you did not know answers for some questions, you still could use logic, and based on the knowledge you already had, guess the right answer – for me it worked 90% of the time 🙂

Another thing why I found this course very useful for myself was that I am looking for the job exactly in this field. I do like to work with code, but I am not that kind of person who can spend 10 hours a day (and more) writing this code; at the same time, I do not feel like working in Tech. Support and System Administration, and this course deals with issues that lie exactly somewhere between these two areas. This course’s topic is exactly what I’d like to be doing in my workplace. Hopefully, I will be able to find this kind of job soon.

It was exciting adventure taking this course, and very useful one for sure. I would definitely recommend this course to people that want to understand how exactly processors work and get to know low-level programming.

Cheers!

see-you-soon1

Recommendations for Apache

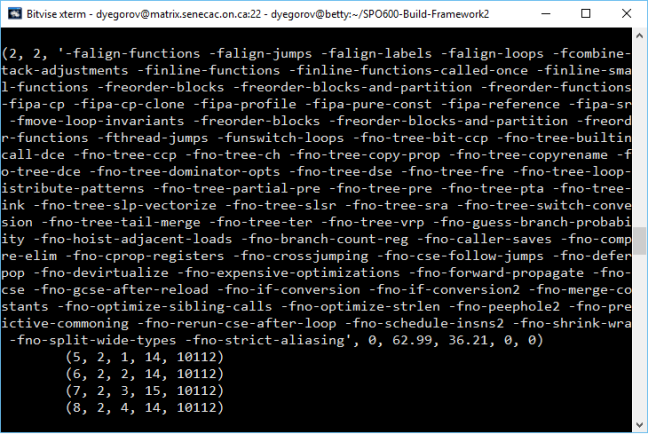
Considering results received from benchmarking runs (discussed in previous post), the following changes to source code/make file can de made by Apache developers:

  1. Developers could add extra logic to make file that would look at resources available (free memory, load of CPU) and determine which options need to be used during compile: if we can not use CPU at maximum, we would use group 6 or group 9; if we are running on low memory (let’s say most of memory is already in use), we would use group 4 or group 6. If both – CPU and memory – are not busy, we would use group 3 for ARM architecture and group 8 for x86_64.
  2. Developers could change their source code to directly fit each architecture: as there is almost no difference in performance for ARM architecture, we could decrease the work of compiler to minimum by applying optimization changes manually (reorder loops, functions, changing type of vars etc) to decrease build time. For x86_64 we could create separate instances of source code, so that each of them either is faster, uses less memory or builds faster – in this we would not need to determine user’s system characteristics, user would choose the build that suits his needs best.

thumbs-up-sign

Testing Apache

Finally we got our main config file working and now we can test our framework with apache and see what and how optimization options affect build and performance of Apache.

The testing was performed on two processor architectures: x86_64 and aarch64.

Aarch64:

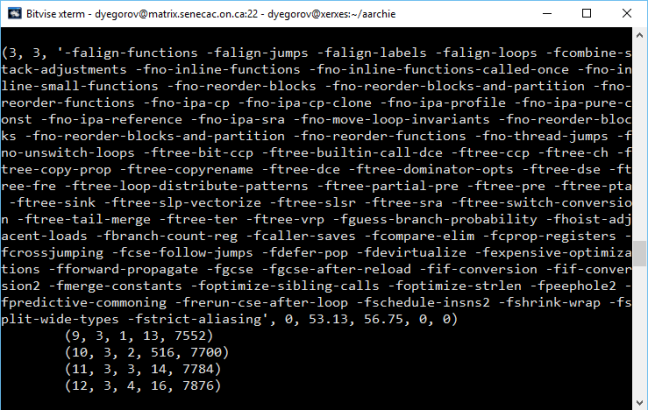
Strangely, all benchmarking tests almost did not differ in terms of performance: speed score was 14-15 and memory score was 1112-1128. Another criteria we could look at to compare the influence of optimization options is build time – the fastest build was achieved with group3: we saved up to 5 seconds of wall time comparing to any other optimization options.


x86_64:

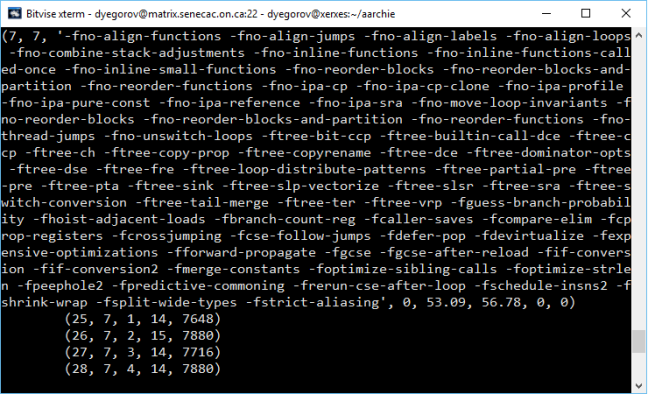
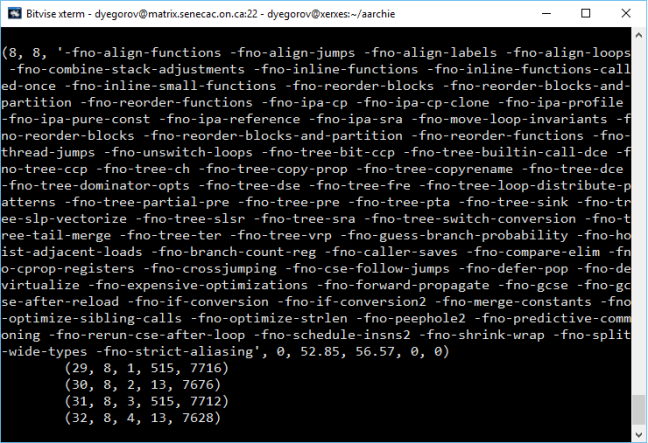
On this machine every combination of optimization options has given different results. The fastest build was achieved with group 8, best memory score was in groups 4 and 6, best speed score – in groups 9 and 6. Interestingly, group 9 has shown 20x better performance in terms of speed and lost to group 4 and 6 in less than 1% of memory score; group 6 has shown not only best memory score, but also 10x faster performance.


Groups Mentioned:

Aarch64 group3
aarch_group3

x86_64 group8
x86_group8

x86_64 group9
x86_group9

x86_64 group4 and group6
x86_group4

x86_group6

Testing framework for apache

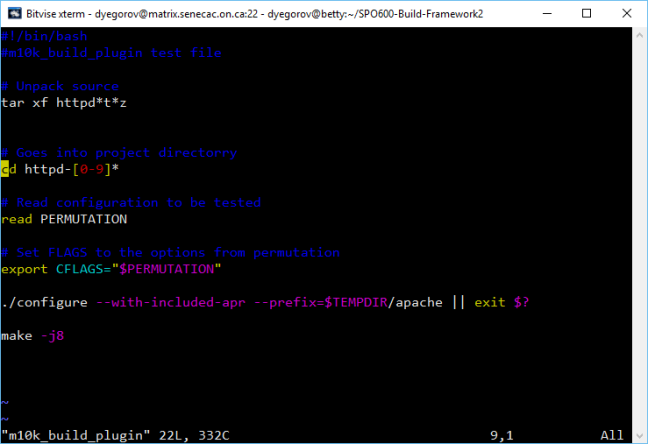
During our course SPO600 we built a framework that is supposed to work with pretty much any linux package – it would install it, test, run and benchmark with different optimization options. At the end, the framework would provide us with results, so we would know how source code can be changed to improve performance. I decided to work on apache 2.4 package. As our testing package for the framework was gip, only few things needed to be changed in plugins, so framework would work with apache: build and benchmark plugin. For the build, we would need to consider apache’s dependencies, like apr and apr util. I decided to stick both directories in source archive, where they ‘re supposed to be during configure, so during configure step we would just say –with-included-apr – user would not need to worry about this. Another option we want to use with configure, would be –prefix=… , as we do not want user to use sudo rights, while running our program, so we would change our install directory to some tmp dir inside user’s home.

build

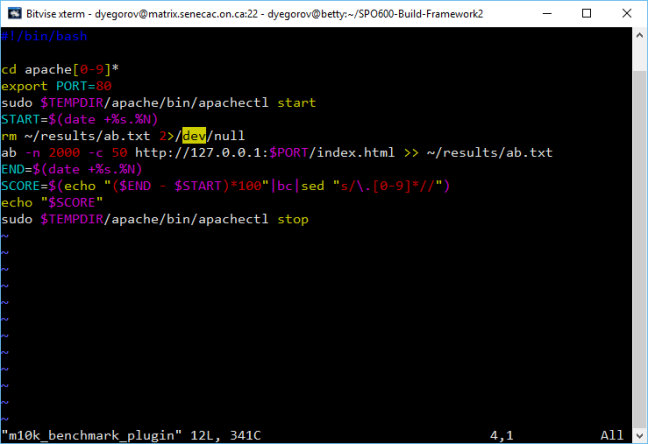
For the benchmark plugin it gets a little trickier. By default, apache runs on port 80 – this is reserved port and it might be used by another web-server that already exists on user’s machine. We need tell apache to start on random port that is not reserved (1000+). Moreover, we need to check is the port is open, as it can be used by another application (this logic can be added directly to plugin just to determine the port number). After we get our port number, we need to change apache’s httpd.conf file. The only way to do this I can think about, is to generate new httpd.conf with same settings as default one except the port number (“Listen” statement) and then replace default file (or just rewrite it with new data) with it. After we do this, we need to start apache and run apache benchmark (ab) to benchmark it and simulate some load and catch requests per second, and stop apache after we’re done. As we did not have enough time, I used benchmarking on port 80 (we had sudo access and there were no other web-services running on machines). If we had more time, extra logic with generating random port, checking if its taken (can be done with simple nmap command and then grep output), and pasting new conf file to httpd.conf could be and will be added during holidays, after the end of semester. For now, benchmarking plugin would look like this:

bench

By performing these tests, I could run our framework with apache and benchmark it with O1, O2, O3 options. Real config file with specific single options didn’t work with our framework, Probably, some of the options where causing build to crash.

When we’ll fix config file, real test will be performed and results fetched. O1, O2 and O3 were used only for testing purposes.

First steps into assembly

So in our SPO600 we got introduced to the assembly language. To describe it in few words, I would call it a “machine language”. Even though it is not in binary, we still provide a CPU with specific instruction, we literally tell it “store this here”, “take data from there”, “do this action to this data and store еру куігде at this address”. Whole concept of assembly language consist of two parts: registers (like variables, can store data) and instructions (action with data that is stored in registers). There are two main types of registers: “system” ones – used for system calls, passing values to functions – and the ones that we can use as variables. The name of registers and syntax (as well as instructions) is slightly different on different architectures, but the concept is the same. What we used to call “commands”, like printf or any other command, is now passed as a value assigned to the specific register (rax for x86 and r8 for aarch) to a system call. Each command has its own value that can be found in a system call table. When you want to execute this command, you just perform a system call with the specific number assigned to the register, used by a syscall.

What do we need it for?
As I mentioned before, this is the last step before the execution, so this is exactly where we can fine-tune our code to get the best performance out of it. Actually, what, for example, -O1 .. -O3 in gcc do is not changing the actual user’s code, but changing how that code is translated to the assembly code – depending on those options we get different “machine” code.

For our lab we needed to create a program that would print a simple loop from 1 to 30 one element per line. While it seems easy to do this is C, I needed to spend some time on writing it in assembler, as it is completely new concept for me. However, after I got used to the way you write in assembler, it was just as easy as in C – as always, the more practice you have, the easier stuff become. The only confusing thing for me was that you should use branches/sections. Whenever you change a branch (whenever I used conditional statement), you start from the beginning of the branch, and there is no way to get back, where you left off – you cannot continue executing code  after jumping from branch2 to branch1 at line 20 of branch1, for example. Getting back to our lab, we needed to print numbers from 1 to 30 and get rid off leading zero if our number is 1 digit number (1-9). You needed to check if that zero exist and then don’t print it. My approach was not actually checking the result of our number divided by 10 (if the second digit from the right is 1 or more), but checking the number itself – if it is up to 9, we don’t even do the division, but we just print the number; if it is 10 or more, then we divide it by ten to get the second digit from the right and then calculate remainder of that division to get the first number from the right and print both numbers.

On the first look it seems complicated, as just to print a number, we need to convert it to char, insert it into out string and then perform a syscall, but actually it is really simple. You just break your complex instructions/commands/operations in C or any other language into smaller instructions. It is like breaking 49*64 into 7*7*8*8.


This is completely new and super exciting concept for me, and I hope I will get more experience and get better at working with assembler.


321

Building Firefox with default options

So for our project we have to pick a package and build it using different optimization options. We will have to find the best build of this package for each machine (arm64 and xerxes).

As with any package, firefox had its own prerequisites. Thankfully, mozilla got a script that automatically checks your system for all dependencies and installs what is missing (dependencies for Linux systems). For some reason I could not do this on ARM64 machine – will have to check for all tools manually. On xerxes it took around 5 minutes to run this script and install all requirements. Of course, this time cannot be used for evaluating purposes, as it highly depends on network usage.

After you are done with dependencies, the build process is pretty much the same as with any other package – download the source, compile, build. However, mozilla uses specific tools for all these steps.

In order to download the source, they suggest to use hg clone command, which is like git – it downloads (synchronizes) content from their server. If you have a slow connection, you can download the source code manually and then unbundle it (how to). After you downloaded the source, you have to configure it by running “./mach mercurial-setup” from source directory. Mozilla comes with a wizard that asks you lots of questions, such as if you want to install specific plugins etc. Configure time takes around 5 seconds system time (depending and the options you choose). All of the configuration options you put in a file .mozconfig. Detailed instructions, options description and examples of config files can be found here.

After that you can finally build the firefox. Simply run “./mach build” from source directory. Build process took 44 minutes of system time on xerxes machine, so you can grab a coffee or have a snack while it is building. More detailed information about building process can be found on Mozilla’s website.


FSOSS 15 or How to contribute your project

This year I got a chance to attend FSOSS 2015 at Seneca@York. There were lots of interesting and worth attending presentations, but the most interesting and, as for me, the most useful one, was “Optimizing your OS project for contribution” by Joshua Matthews. The presenter pointed out many important things to consider when preparing your project, and to summarize most important ones I would conclude that you should sort off your tasks (bugs/developing problems) and reply as soon as you can. Interesting fact, if contributor doesn’t get a reply from project manager or whoever is in charge within 24 hour, there is a chance of 80%, as I remember, that he will leave. You can lose around 80% of your potential contributors only because you do not reply on time. Seriously, who wants to work with a person, for whom he is not important enough even to reply within considerable amount of time. Yes, you might not be available all the time, or you can be on a vacation or whatsoever, but in that case create an auto-reply or something like that, so the contributor will see that you acknowledged his question/request and will get back to him shortly.

Another important point was that you have to sort your tasks. Everyone gives the best performance at what he can do the best – java developers should be working on with java, C devs. with C etc. Not only you have to sort your tasks by languages/areas of work, but also in terms of skill level of a contributor. You don’t want to give a newbie tasks with high difficulty as well as you don’t want to waste potential of professionals. At the same time, if the person is proficient in C, let’s say, and you have a bug in your core (which is written in C as well), you might want to give this task to a person, who is more familiar with your code and have just enough skills and knowledge to solve the issue, instead of assigning this to someone more professional in programming language, but have no idea about your core structure.

Another amazing point mentioned by presenter was to use tags. With tags you can sort your assignments by all the categories at the same time. Also it is way easier to identify, if you are using multi-colour tags, let’s say.


Overall FSOSS was realy interesting and entertaining event to attend.

Hopefully I will be able to visit it next year 🙂


How so-called a.out depends on gcc options.

As we all know, computers do not understand what “printf (“Hello world!”)” is. In order for us to get expected result, we need to translate our code into the language that computer can understand. This can be done, just like with translating any human languages, by using “dictionaries” – compilers. One of the compilers we played with was gcc.

So how exactly our code will be translated into pc’s language? Just like with human languages, it can be done in many ways – you can say one thing in many ways (e.g. “How are you?”, “What is up?”, “How’re you doing?”). Even though the meaning remains the same, the form is different. Same thing with gcc – using different options, you get same result (output), but in different forms.

Test 1 -static

With this option we got enormous increase in size – around 8.600%! As for man page, -static prevents linking with shared libraries, so my guess is that it links ALL available libraires – that is why our output file got so much bigger.
Using objdump, I noticed that we got way more sub-sections in <text>  section, such as backtrace and map, group_number etc. Our function got changed from printf@plt to _IO_printf. Also .rodata section got a lot bigger.

Test 2 remove -fno-built-in

With this option we save about 0.2% of space, which might not be that big with our program, but imagine if we have a 100GB program – 0.2% would be around 200MB, which is already something. printf@plt got changed to puts@plt. In this example it uses built-in function optimization, so it decided that using puts function is more efficient than using printf.

Test 3 remove -g (debug)

Around 10% less size!!! EFL file doesn’t have debug info, which explains why output file got smaller. On the other hand, now we do not have any “explanations” for sections in EFL file.

Test 4 add int parameters to printf

Our “data” for printf is now stored in registers. After adding 3 integers we saved 0.1% of space – we got more data that takes less space, which may sound weird, but now we tell printf of what data type our argumets are. It probably links less libraries that were used to determine what data type the arguments for printf are.
After adding more integers, I noticed a pattern:
first five are “mov *register*, 6-9 are “pushq $0x6 $0x7 etc”, 10+ are “pushq $xa $xb etc”

Test 5 put printf in separate function

Now we have separate declaration/section for the output function; in >main> we have less action/data. Some fields are replicating in main and output, such as “push %rbp; mov %rsp,%rbp” and closing registers – probably used to make an action stack 64bit long (my guess).
New file is 1.6% bigger than the original one – can say that all that duplicated data, such headers for functions, are worth this 1.5% in our case.

Test 6 -O3 (optimization lvl3)

15% less space! This is just huge! We got rid of headers/footers for our <main> function. With more complex program, we definitely would be able to see more changes.

Bugzilla? GitHub?

Few months ago I was talking to my friend and he showed me the bug in Mozilla and told me how that is that all the people using Mozilla will benefit from his small, but noticeable, fix. And now, as I’m taking SPO600, this Mozilla story “strikes back”. So how do you contribute to the Mozilla community?

After making some research on this, I found a page on Mozilla developers portal that actually describes this process step-by-step. Firstly, you have to install Mozilla, of course, (even though in order to fix some bugs, you don’t even need Mozilla, as “bugged” code is provided in a bug description – I found in pretty funny). After that, find a bug that you can fix on bugzilla – good choice for beginners would be bugs marked as “good for beginners”, or you can just search for the “beginner” key-word. You can look for bugs in all of Mozilla’s modules starting from Firefox and ending with Thunderbird or even their Marketplace.

So after you decided what you want to work on, and you got it done and working, you attach your patch/fix on the bug web-page and ask for review. However, it is not as simple as it looks – you have to find a reviewer ID first. Your options for finding the correct person are here. Of course, you have to follow it up, as the reviewer might ask for some additional info or you might have to change your code. As with any code, you will have to spend some time on fixing minor (or major) errors to make it perfect and to make it fit into the tree. This process goes on until you get an r+ from your reviewer (just like in school, eh?) – when you get it, it means that your code is ready to be implemented into the tree!

At the final step, your code will be tested on a try-server (your mentor will help you with that), and after it receives a green light, you just mark that your patch is ready to commit by adding “checkin-needed” keyword to the keywords of your bug (you can find it at the top of the page). Shortly your patch will be implemented into Mozilla! More detailed info can be found here and here.

Now let’s talk about another Open Source project and one of the most used OpenSource portals GitHub.

Bitcoin

This digital currency-open source project is developed and released under MIT licence and “hosted” by GitHub. So how do we contribute to this project? Simple as one-two-three!

  1. Register on GitHub if you are not registered yet;
  2. Go to the Bitcoin section on GitHub
  3. Create you patch proposal and make a “pull request” at their page and upload your proposal.
  4. As with any project, you will have to wait for some time for people to review and approve your proposal. Meanwhile you can review proposals of other contributors.
  5. After your proposal got approved, project maintainers will merge the pull together and Project leader will O.K. your proposal.

The good thing about GitHub is that everyone can review everyone – it is pretty democratic portal. People can point out your mistakes or give you suggestions on how to make your code more efficient as well as you can be the one who reviews others code.

Which “method” of working in OpenSource is “better”? I would stick with GitHub, as you can work on many projects there as well as you are not depended on your “mentor”/reviewer – everyone can be this person, which fastens the contribution process and simplifies the work of project managers.